How to Paint a Skateboard With Acrylic? – 2021 Unique Guide
Are you bored with your skateboard deck art? Or is it the quality of the paint job that you are not very happy with? In either case, you will want to change the looks of your skateboard deck completely. However, you need to know how to paint a skateboard with acrylic for that.
In this article, you and I both will learn from Natasha how to paint the skateboard decks effectively at home. It may sound a little bit difficult to some of you who don’t know painting just like me. But don’t worry because you can always practice your skills on older boards.
Having that said, for those who know a little bit of painting this can help them change the looks of their skateboard deck and wheels completely.
Are you excited? I know you must be, so without any further ado let’s not waste any more time and jump straight to Natasha’s tutorial on painting the skateboard decks.
Things You Will Need For This Project
Before you start working on this project idea you will need to gather all the required tools. You can grab all these supplies from your local store you buy them online.
For your convenience, I have listed all of them that will help you in painting your skateboard deck. Below are the things that you’ll need during the painting of your board.
- 800 – 1000 grit sandpaper
- Acrylic paint (You can also use spray paint)
- A Marker
- Sheets of old newspaper or scrap paper (to keep the surrounding clean)
- An old t-shirt (to wear before working on the project)
- masking tape (for making boundaries)
- WD 40 spray (for cleaning the wheels and bearings)
- A Screwdriver (for removing the parts)
- Spray paint (if you change your mind later)
- A mask (for personal safety)
- Some paint brushes
Painting A Skateboard With Acrylic
In this DIY project, I will be using the DB Longboard. However, the same method is applied to skateboards as well. So you don’t have to worry about anything at all.
Step 1 Removing The Hardware
before you actually start working on the project and paint your skateboard you’ll need to remove all the hardware from it.
Take a screwdriver and start by removing the trucks first. If you want to paint the wheel then you will have to detach them from the trucks.

However, I wouldn’t recommend painting the skateboard wheel because with constant skateboarding, the paint job will be removed. So this isn’t something worth spending too much time on it.
Once you have successfully removed the trucks from the deck of the board, you can proceed to step 2.
Step 2 Sanding The Deck of The Board
No matter whether you are using acrylic paint or spray painting the deck you will have to remove the old paint job. If you are using a blank deck then you can skip this step because you don’t have to sand the deck of the board.
Having that said, I would still recommend using fine-grit sandpaper. It is because sanding the deck of the board will help the paint stick to it.

Besides that, if there is an old design on the board, you will have to remove it for effective painting. Sanding the board isn’t that difficult and you can do it as if you are sanding a regular wood.
The most important thing to remember is to choose your sandpaper wisely. Make sure to get something between 800 to 1000 grit for removing the old design.
Step 3 Make An Outline on The Board
Once you have successfully executed the above-mentioned steps, then there are only a few more steps left. Before you actually start to paint the board, you will have to make an outline for yourself.

Without a proper outline, even a skilled designer will not be able to produce quality design elements.
You can use a marker to create an outline before you paint your skateboard. Using a marker is the easiest way to complete the project without ruining it. However, a simple marker outline will not be enough.
You can use masking tape to cover the board. Using masking tape on the borders of your design will help to cover the unwanted area of the design.
Thus you can paint it freely without having the fear of accidentally putting paint on the unwanted area.
Creating an outline will also help speed up the process as you can easily determine which color to use on a specific area.
Step 4 Start Painting The Board
After creating the basic outline of your design, the next thing you’ll need to do is to finally paint the skateboard. This is the fun part and is exactly what you were waiting for.

A few important things to remember are, acrylic paint is water-soluble.
You will have to wait for a layer to dry completely before you start the other part of the design.
Carefully paint the whole skateboard and make whatever design you like on it. Once you have finished the design on the board put it somewhere safe. Keeping the board in a well-ventilated place will help it dry quickly.
Once the paint is dry, try to use a clear sealant to secure the design and make it last longer. Although it wouldn’t last forever at least it will survive for a few extra months.
Step 5 Put Everything Back To Its Place
Once the paint is dry and you can see the design of your choice the then you should attach the hardware back. Start with attaching the wheel first if you have removed it.

After attaching all of them place one truck and then the other on the deck and using screws and a screwdriver mount them carefully.
After putting all the parts back on your skateboard, it should be ready for skateboarding. You can now take it to skate parks and make your friends jealous with the stunning designs.
Things To Keep In Mind During The Project
While trying the designs of your choice on your skateboarding deck you need to remember a few things.
Acrylic paint isn’t like spray paint or any other color that will last longer for years. It will wash away if you try to skate in rain or on wet surfaces.
Make sure to thoroughly sand the whole deck of the skateboard. Apart from that, don’t forget to sand the sides too because these are usually ignored when people try different designs.
Make Always use painter’s tape while coloring the edges. It is because the painter’s tape will help to prevent the color from staining different parts.
If you need more information about paint, colors, and designs you can always contact a nearby painter.
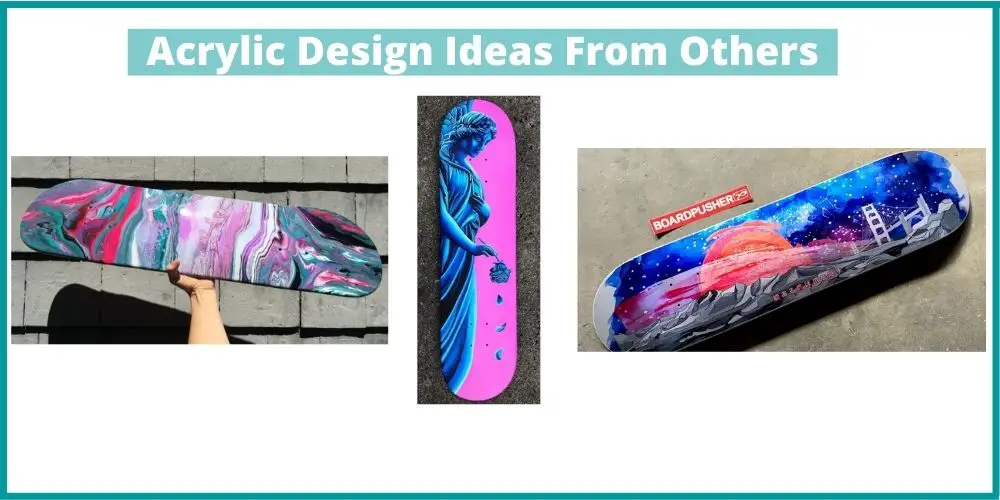
Acrylic Design Ideas From Others
Although I found Natasha’s tutorial to be quite easy and effective. However, I wanted to check the internet for some more info. During my research, I found some other cool designs that you can try.
They are as follow:

SEE RELATED OTHER ARTICLES:-
Last Minute Thoughts
Testing new designs on your skateboard can be a fun DIY project to do at home. In this article, Natasha taught us how to paint a skateboard with acrylic.
These are the only supplies needed for this tutorial, which must be available at any craft store or art supply place for $15 to $30 USD depending on brand name and size.
Here’s a quick summary of the whole article.
After removing the hardware from the board, sanding it with fine-grit sandpaper, and creating a basic outline, you can use a stencil if you have any.
Finally, start coloring by starting on one side corner and working your way across in sections to avoid the paint from drying before you get there.
Remove all tape when done and let dry for 24 hours before riding so that it won’t peel off!
I am very thankful to Natasha for creating such an easy tutorial on a simple topic. Please give her a huge shout-out by subscribing to her YouTube Channel and following her on Instagram for more helpful DIY projects.
I hope you have enjoyed reading this article. If you have anything in your mind please feel free to share with me through the comments. besides that, you can also share my article on Pinterest and Reddit.
Good Luck!


